Wednesday, 8 January 2014

Raspberry banana smoothei

What Are Some Of Your Favorite Fruits?

Try This Healthy Raspberry and Banana Smoothie! It's Healthy And Delicious!

1 banana (6 oz peeled and cut into chunks)
1 cup orange juice
1/2 cup nonfat yogurt (vanilla or try using greek yogurt for a healthier option)
1/2 cup raspberries (frozen)


Tuesday, 7 January 2014

Creamy, yummy mustard chicken

In this healthy, High fiber | Low saturated fat | Low cholesterolLow sodium | Heart healthy |creamy mustard chicken recipe, thin-sliced chicken breasts (about 1/2 inch thick) cook quickly and are delicious smothered in a velvety, light mustard sauce and garnished with fresh chopped sage. 


INGREDIENTS
1/2 package whole-wheat angel hair pasta (7-8 ounces)
4 thin-sliced chicken breasts or cutlets (about 1 pound)
1/2 teaspoon garlic powder
1/2 teaspoon salt, divided
1/2 teaspoon freshly ground pepper, divided
1/4 cup all-purpose flour
3 tablespoons extra-virgin olive oil, divided
1 large shallot, finely chopped
1/2 cup dry white wine
1/2 cup water
1/4 cup reduced-fat sour cream
2 tablespoons Dijon mustard
2 tablespoons chopped fresh sage, plus more for garnish

PREPARATION

  • Bring a large saucepan of water to a boil. Add pasta and cook according to package instructions. Drain.
  • Meanwhile, sprinkle chicken with garlic powder and 1/4 teaspoon each salt and pepper. Place flour in a shallow bowl and coat both sides of the chicken, shaking off any excess. Reserve 2 teaspoons flour; discard the rest.
  • Heat 2 tablespoons oil in a large skillet over medium-high heat. Cook the chicken, turning once, until golden brown and cooked through, 3 to 4 minutes per side. Transfer to a clean plate.
  • Reduce heat to medium and add the remaining 1 tablespoon oil to the pan. Add shallot and cook, stirring, until beginning to brown, 30 seconds to 1 minute. Add wine and cook, stirring occasionally, for 1 minute. Combine water with the reserved 2 teaspoons flour. Add to the pan and cook, stirring, until thickened, about 1 minute. Remove from the heat; stir in sour cream, mustard, 2 tablespoons sage and the remaining 1/4 teaspoon each salt and pepper. Return the chicken to the pan and turn to coat with the sauce.
  • Top the pasta with half the sauce, the chicken and then the remaining sauce. Garnish with more sage, if desired.

NUTRITION

Per serving: 447 calories; 16 g fat ( 3 g sat , 10 g mono ); 69 mg cholesterol; 42 g carbohydrates; 0 g added sugars; 31 g protein; 6 g fiber; 456 mg sodium; 367 mg potassium.

Nutrition Bonus: Magnesium (25% daily value), Iron (16% dv)

Carbohydrate Servings: 2 1/2

Exchanges: 2 1/2 starch, 3 lean meat, 2 1/2 fat

Source:

Sunday, 5 January 2014

Turkish single-pan eggs & peppers

This gutsy dish is genuine street food and a brilliant family dish for brunch, lunch or supper. Very easy to prepare and serves 4.


calories  222, protein 12g, carbs 12g, fat 15g, saturates 4g, fibre 3g, sugar 9g, salt   0.39g

Ingredients

  • 2 tbsp olive oil
  • 2 onions, sliced
  • 1 red or green pepper, halved deseeded and sliced
  • 1-2 red chillies, deseeded and sliced
  • 400g can chopped tomatoes
  • 1-2 tsp caster sugar
  • 4 eggs
  • small bunch parsley, roughly chopped
  • 6 tbsp thick, creamy yogurt
  • 2 garlic cloves, crushed

Method

  1. Heat the oil in a heavy-based frying pan. Stir in the onions, pepper and chillies. Cook until they begin to soften. Add the tomatoes and sugar, mixing well. Cook until the liquid has reduced, season.
  2. Using a wooden spoon, create 4 pockets in the tomato mixture and crack the eggs into them. Cover the pan and cook the eggs over a low heat until just set.
  3. Beat the yogurt with the garlic and season. Sprinkle the menemen with parsley and serve from the frying pan with a dollop of the garlic-flavoured yogurt.
Recipe from Good Food magazine, May 2011

Italian tomato and mozzarella salad for kids


Dietitian's tip:

This kid-friendly recipe is quick and easy for young cooks to prepare with just a little help from an adult.

Serves 5

Ingredients
8 ounces fresh part-skim mozzarella balls, about 15 balls
8 ounces grape or cherry tomatoes, about 10 tomatoes
10 large fresh basil leaves
10 fun party picks or any long toothpicks
Balsamic vinegar (optional)
Directions

Cut each mozzarella ball in half. Set aside. Then cut the tomatoes in half and set them aside too. Tear each basil leaf into 3 or 4 pieces.

Stick the sharp end of a pick through one basil leaf. Then add a tomato half to the pick. After that, add half a mozzarella ball. Repeat by adding another tomato half, followed by another mozzarella half and finish with one more tomato half. Fill 9 more toothpicks in this way.

Eat as is or sprinkle a little vinegar on first.

Nutritional analysis per serving

Serving size : 2 items
Total carbohydrate                   3 g
Dietary fiber                               0.6 g
Sodium                                        284 mg
Saturated fat                              5 g
Total fat                                       7 g
Trans fat                                      0
Cholesterol                                 23 mg
Protein                                         12 g
Monounsaturated fat               2 g
Calories                                       123
Sugars                                          0

This recipe is one of 50 collected in "The Mayo Clinic Kids' Cookbook," published by Good Books and available in bookstores.

Source:

Friday, 8 February 2013

Fudge recipe without sugar II

Sugar Free Chocolate Fudge

Ingredients

    1/4 cup unsweetened cocoa powder
    Margarine 1/2 cup
    2 eggs
    1/4 cup skim milk
    3/4 cup all-purpose flour
    1 sweetener Splenda granulated sucrose as the cup or any other alternative to sugar
    Chopped walnuts 1/2 cup
    1 package sugar-free
    Candy flavored instant pudding
    1 cup skim milk
    1/8 teaspoon salt

Preparation

Grease and flour a 8x8 inch pan. Preheat oven to 350 º F or 175 º C. Take a small saucepan over medium heat and using, melt butter and cocoa together. Stir intermittently and sporadically until smooth. Remove pan from heat and let cool enough. Take a large bowl, beat eggs until bubbly. Stir in Splenda, a sweetener sucrose.

Now mix flour and salt, then stir in the egg mixture, then add the cocoa mixture and melted margarine. Add skim milk and finally the nuts at the last moment. Pour mixture into prepared pan homogeneous.

Bake for 25 to 30 minutes in the preheated oven, until a toothpick inserted in center comes out clean. Mixture of milk chocolate without sugar and 1 cup of skim milk using a blender to make ice. Mix for two minutes or until thickened. Distributed cakes to cool before cutting into squares 1. "Your candy is ready to parties 25. These recipes make great snacks or desserts. Bon Appetit!

Thursday, 7 February 2013

Starwberries Romanoff

My childhood favorite. I just called it strawberry dip not knowing it actually had a name. Other variations include adding a tiny bit of orange zest or the juice of an orange, or a splash of Grand Marnier. I think it's perfect without. A simple yet elegant dessert. The combination of sour cream with the sweetness of the brown sugar is absolutely addicting! Serve this in a champagne or martini glass with a mint leaf for an elegant presentation.

Skinny Strawberries Romanoff


Servings: 5 • S Size: about 5 strawberries + 2 tbsp cream • Old Points: 1 pt • Points+: 2 pts
Calories: 77.2 • Fat: 2.4g • Protein: 2.1 g • Carb: 12.8 g • Fiber: 2.1 g


  • 16 oz strawberries, washed and cut
  • 4 oz low fat sour cream
  • 2 tbsp brown sugar

Combine sour cream and brown sugar. Place about five strawberries in each glass and drizzle each with 2 tablespoons of cream sauce.

Tuesday, 29 January 2013

How to make Sheer Kurma

This special Sweet dish is traditionally served on Eid day (both Eid Al-Fitr and Eid Al-Adha) to the household after they come back from Eid prayers. It is then served throughout the day to all well wishers and guests who come to celebrate Eid with you. It is served by Muslims from a variety of ethnic backgrounds, Arab, Asian, America, European, Southeast Asian, Oriental, etc.
Sheer kurma

1 package vermicelli
1 gallon fresh whole milk
1 cup sugar
20 cloves whole cardamom pods
1/2 teaspoon cardamom powder
1 cup slivered almonds, cashews and pistachioes
1/2 cup fresh cream
1/2 teaspoon saffron strand
3 tablespoons charoli nuts
1/2 cup light brown raisins
1/2 teaspoon rose water
1 tablespoon butter

Directions:

1 Fry the vermicelli in the butter until well browned but not burnt.
 
2 Fry on low heat until all the butter is dried.

3 Add in 1/4 cup sugar and fry again.

4 Add in the whole milk cup by cup, stirring constantly, and bring to boil.

5 Add in the raisins, whole cardamon, and 1/2 cup slivered almonds, cashews and pistachioes, and the remaining sugar.

6 Reduce the heat and thicken the SHEER KORMA to three-strand consistency, letting the milk boil until it is halved.

7 The vermicilli must be very soft by now.

8 Quikly add in the rose water, charoli and fresh cream and let simmer covered for 10 mins.

9 Garnish with the saffron strands and powdered cardamom, and serve immediately.

10 This special dish is served on the morning of Eid day to all the household, after the Eid prayer, as breakfast, and throughout the day to every guest that visits you.

11 It keeps fresh for up to one week in the fridge.

How to make Beet root juice

Beets are very high in nutrients, and knowing how to make beet juice is a great way to add those nutrients to your diet. With regular consumption, beetroot juice can lower high blood pressure, purify blood, and improve circulation. It can also cleanse and improve the health of the liver, kidney, bladder and intestines, and help prevent colon cancer. 

beetroot juice


Beetroot juice is also a rich source of vitamins B, vitamins C and A, folate, calcium, magnesium, potassium and powerful antioxidants. However, beetroot juice is a powerful cleanser that you should drink moderately in small amounts and dilute with other vegetable and fruit juices to prevent the body from detoxifying too quickly. Adding other fruit and vegetable juices also tames beetroot juice's potent flavor.

You may be wondering how to make beet juice. Juicing beets allows you to get all of the vitamins and nutrients of the beet in a concentrated form. Whether or not you have a juicer in your kitchen, you can create beet juice and tasty beet juice blends. 

Things You'll Need

  • Some beets
  • Kitchen knife
  • Produce brush
  • Cutting board
  • Carrots
  • Celery
  • Cucumber
  • Apple
  • Fresh ginger
  • Juicer

Instructions

Choose a small beet that is firm and smooth, not soft or shriveled. Not only are smaller beets sweeter than larger beets, but half of one small beet yields 1 ounce of beetroot juice, which is just the right amount of beetroot juice you need each day to reap its health benefits. 
 
Cut off the leafy green top of the beet. Rinse the beet and scrub it with a produce brush to remove any dirt that running water does not remove. Peel the beet, if desired or if the skin is too tough. 
 
Cut the beet in half or in quarters, depending on the size of your juicer and its motor strength. 
 
Rinse and prepare any other fruits and vegetables that you want to mix with the beetroot juice, then cut them into small enough chunks to fit your juicer. Try two carrots, one celery stalk, half a cucumber and 1 cup of pineapple chunks, or any other combination of fruits and vegetables you like. Add an apple or fresh ginger into the mix to sweeten the potent flavor of beetroot juice. 
 
Juice half or all of your beet one chunk at a time, according to to your juicer's instructions. Beets are hard vegetables that may strain your juicer's motor and take time to juice, but don't force the juicing process. Juice the other fruits and vegetables of your choice one chunk at a time, then mix with the beetroot juice.
 
You should be aware that the color in the beets can turn urine and bowel movements various shades of red. This can be very disconcerting if you are not expecting it, but it is harmless. Enjoy beet juice in moderation, and cleanse you body in the process.

Wednesday, 23 January 2013

How to make Sugar free sweets at home, Make Nutritious, Sugar-Free Sweets for Your Kids


You Don't Want to Deprive Your Kids, but Sugar is Making Them Crazy. There's Another Way to Keep Things Sweet

1) Sugar free Jelly

Sugar Free Jelly


Ingredients
 
1 sugar free jelly
2 packs powdered gelatine

Method


Makeup the sugar free jelly with 1/2 pint water
Add 2 sachets powdered gelatine
mix well. You could even add some cream to the mix to make "creamy" sweets!

makes about 24 sweets ...I use silicone sweet moulds as the 'jellies' are easily turned out.

These are good when you just fancy that sweet 'kck'
I find they are best kept in the fridge as they stay firmer


2Sugar Free Fruit Cake

Try this cake made with lots of dried fruits, nuts and spices.

Sugar Free Fruit Cake
Ingredients
  • 8g artificial sweetener (8 x 1g sachets)
  • 80ml orange juice
  • 110g dried cranberries, chopped
  • 165g sultanas
  • 1/2 teaspoon salt
  • 175g walnuts, chopped
  • 240g tinned pineapple, crushed
  • 25g grated lemon peel
  • 75g desiccated coconut
  • 1 teaspoon ground mace
  • 1 teaspoon ground allspice
  • 1 teaspoon bicarbonate of soda
  • 200g plain flour
Preparation method

Tuesday, 22 January 2013

How to Make Homemade Gourmet Fat-Free, Sugar-Free Ice Cream with ice-cooling (directions, recipe, with photos, easy and f...Eaziest way to make Sugar free icecreame at home

What's better than fresh premium fat-free, sugar-free ice cream?  So let's make our own homemade fat-free, sugar-free ice cream!
Number of Servings: 1


Ingredients


    1 tbsp Sucralose (or Splenda)
    1/2 cup 2% Milk (or another milk of your choice)
    1/4 tsp Vanilla Extract
    Sandwhich Size Zip-lock Bag
    Quart Size Zip-lock Bag
    6 tbsp Rock Salt


Directions


1) Measure out and mix sucralose, milk, and vanilla. Pour into a small zip-lock bag (sandwhich size)
2) Take a quart size zip-lock bag and fill about halfway with ice. Add rock salt
3) Place small zip-lock bag into the bag with the ice and seal it closed.
4) Squeeze the large bag with your hands for about 10 minutes or until the mixture in the small bag is firm
5) Pour ice-cream into a small cup and enjoy!!

How to make sugar free cheesecake at home

Like Cheesecake? Can't have sugar? then try this one.

This is a basic cheesecake recipe. You can serve this dish up to diabetics and their loved ones. I like it with a strawberry topping, especially when strawberries are in season.

Ingredients:


For the Filling:

5 8-ounce packages cream cheese, softened
1-1/2 cups sugar equivalent substitute
3 eggs
½ cup Fage Total Classic Plain Greek yogurt
1 Tbsp lemon juice
1 ½ tsp vanilla extract

For the crust:
1 cup almonds, whole
2 Tbsp sugar equivalent substitute
4 Tbsp butter, melted

For the topping:
1 cup unsweetened, heavy whipping cream
2 Tbsp sugar equivalent substitute
Fresh fruit

Making the crust:
Process nuts together until resembling coarse crushed graham crackers. Mix almond meal, butter and sweetener. Press in bottom of a 9-10” spring form pan. Place in fridge.

Making the Filling:
Heat oven to 325 degrees Fahrenheit.
In a mixer, beat cream cheese with sweetener on medium for about one minute. On low, add eggs, one at a time, until just blended. Finally, add Fage, lemon juice and vanilla and beat just until blended (10-30 seconds).
Pour into crust. Place a pan of water in the rack below the cheesecake. Bake until set, 1 hour 15 minutes-90 minutes. Cool on rack for 15 minutes before moving to chill in the refrigerator.

Making the Topping:
Combine whipping cream with sweetener and beat in a mixer for 3-5 minutes, or until stiff peaks form. With a spatula, gently frost the top of the cheesecake with topping. Cover with fresh fruit.

Saturday, 19 January 2013

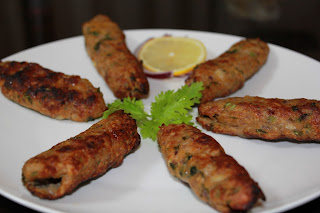
How To Make Seekh Kababs At Home ( Best Seekh Kebab Recipe)

Seekh kabab is one of the most popular varieties of kabab. Traditionally it is cooked in a charcoal oven which gives a wonderful texture and flavour to the kababs. But it can also be made easily at home with minimal effort and yet without any compromise on taste. I have given below the recipe of making seekh kabab by frying in oil.

Seekh Kabab
Seekh Kababs are mouthwatering starters and good for a party. They can also be served as part of a main course. Everyone always asks me for the recipe when I make them! Morever they can be made within an hour

Ingredients

For Making 10 Kababs
  • Boneless Beef 1kg (in thin steaks shape)
  • Yogurt 1cup
  • Mustard oil 1 cup
  • Raw papaya 2 Tb-sp
  • Onion paste 2 Tb-sp
  • Ginger paste 1 Tb-sp
  • Garlic Paste 1 Tb-sp
  • Cumin powder 1 tea-sp
  • Black pepper 1 tea-sp
  • Salt 1 tea-sp
  • Red paprika powder 2 tea-sp
  • Garam Masala 1 tea-sp
  • Poppy seeds(khus khas) 1 tea sp
  • Cooking oil

Preparation method

  Preparationtime 30 mins | Cooking time 30 mins
  • Apply the salt and mustard oil on beef pieces (beef parchey). Let it marinate for 2 hours in salt and mustard oil.
  • Take a bowl and mix yogurt, raw papaya, onion paste, garlic ginger paste, all spices, poppy seeds. Now mix the beef pieces (parchey) in this yogurt mixture and marinate it again for 2, 3 hours.
  • When the beef pieces get marinade, sew them on skewers separately. Use one skewer for each beef piece (parchey)
  • Grill the skewer on low heat of coal for at least 10 to 15 minutes each side. Turn or rotate the skewer so that Behari Seekh Kabab can grill evenly.
  • Brush the oil time to time.
  • When it Behari Seekh Kabab are turned into light brown color, remove them from flame and squeeze the lemon juice
  • Serve hot with onion and cucumber salad and roghni naan.

Monday, 14 January 2013

How To make Pizza Sauce

Making Pizza Sauce
Normally at home, we recommend using tomato sauce only which is lightly herbed with oregano and basil. Some pizza lovers prefer to have even simpler sauce than this, however tomato sauce is the simplest to prepare at home.
Ingredients:

3 Tbsp. - Butter
16 Oz. - Can of tomato puree
3 Tbsp. - Olive Oil
1 Tsp. - Salt
3 Cloves - Garlic, minced
1/4 Tsp. - Black Pepper
3 Large - Yellow onions, minced
1 Tsp. - Whole oregano
2 Qts. - Canned whole Italian tomatoes
1 Tsp. - Whole basil


Process
Melt the butter with olive oil in an oven or large skillet. Now slowly but completely sauté the garlic and onion. Then add the tomatoes, salt, pepper, oregano, basil and puree. Boil it.
Cover the mixture and let it bubble for two hours. In between, stir it occasionally. Crush the tomatoes with the masher. Continue the process till the sauce reaches the consistency of a soup.
Set the sauce aside to cool before applying it to your pizza dough, or, or refrigerate it for use in the future.
Pizza Topping
Ladle about 7 to 8 oz. of pizza sauce into the middle, bottom of the dough shell. Spread the sauce evenly over the surface of the dough sheet. Spoon the sauce out to the edge of the dough sheet. Leave a small margin on the outer-side of the dough sheet, which allows the crust to rise and crisp more quickly than the covered dough; creating the classic, puffed up edge of the pizza.
Now create a layer of the shredded cheese over the sauce. Shred about two cups of cheese. Arrange your toppings over this layer of cheese.
Add toppings according to your preference.
Baking the Pizza

Preheat your oven up-to the temperature of 450° F for about 10 to 15 minutes. When preheating is done, place a prepped pizza in the oven at the centre. Place the pan in the oven such as there is maximum circulation of air around the pan. The baking will take about 10-15 minutes at that temperature.
Signs to look for that the pizza is ready are:

1) The cheese has melted on top and is beginning to brown.
2) The crust edge has browned, from a medium to a golden brown.
3) Now carefully lift the edge of the pizza to inspect its bottom, it should be evenly brown.

If these signs are evident, your pizza's done! Thus now you are ready to throw regular pizza parties of your home made pizza to your friends and family.

Thursday, 27 December 2012

How To make Pizza At Home

Pizza is one of the most popular food of the world. Pizza is one of the most popular dishes around the world. It is generally a flat round bread which is oven-baked and covered with tomatoes or a tomato-based sauce and mozzarella cheese. Toppings are also added depending on the region, culture or personal preference. In this article, we will be learning how to make a pizza at home.

The basic steps in pizza making are first preparing dough, then pizza sauce. After that, cheese and toppings are added according to taste and then the pizza is baked in an oven. This seems to be simple while reading but preparing a good mouth watering pizza at home drains in a lot of hard work. However, you will be able to make pizza at home easily using this step-by-step guide.
Let's start from the scratch.

Making Pizza Dough
Dough making has been known to humans since ages now, but mastering the art to make perfect pizza dough can be a bit cumbersome sometimes. At home, Pizza dough is prepared by hands, no special machinery is required. However to prepare hand-made dough you will need to have a large mixing bowl, a measuring cup, measuring spoons, a large whisk or wooden mixing spoon and some kitchen film before you start. It will be better if you also keep a small hand towel ready before starting the process.
Ingredients:
1 - 1/4 Oz Envelope - Active dry yeast, (or 2 1/4 Tsp)
1 1/2 Cups - Warm water (110°F - 115°F)
4 Cups - Bread flour
1 1/2 Tsp. - Salt
2 Tbsp. - Extra virgin olive oil
1 Tbsp. - Sugar
Extra flour
Extra olive oil

Process
Pour the warm water in a large mixing bowl, then add the sugar and dissolve it. Next, dissolve the yeast by stirring continuously after addition. Allow the mixture to settle down for 10 minutes or extra so that the yeast becomes active.
Now add the yeast and olive oil, when the appearance of the mixture becomes foamy and cloudy at the surface. Dissolve it continuous stirring. Then add 3 cups of flour to the mixture one-by-one and whisk in until dissolved completely. Make sure the mixture is completely smooth. Use your hands to combine the dough until all of the dry flour has moistened into a mass.
When the flour has absorbed all of the moisture and congealed into a firm mass, remove it from the bowl to a floured tabletop to knead it. Fold it in half again and push it into itself, again and again for perhaps 10 to 12 minutes or so, or about 200 cycles. It is very important that the dough is very well kneaded.
After kneading is complete, when dough transforms into a silky, smoothly-textured ball, coat the dough ball with a thin layer of olive oil. After that place it in the bottom of a large mixing bowl that has also been coated on the inside with olive oil.
Now comes the step on panning the prepared pizza dough. One of the most demanding of the pizza maker's many challenges is getting the raw pizza dough ball into a pizza pan. The panning of pizza can be done by various methods as per your convenience. The popular methods are Pizza dough sheeting, pizza dough pressing, hand tossing pizza dough- do it only if you don't get hazy when catching, hand pressing pizza dough, and last is pin rolling pizza dough.

Making Pizza Sauce 

Normally at home, we recommend using tomato sauce only which is lightly herbed with oregano and basil. Some pizza lovers prefer to have even simpler sauce than this, however tomato sauce is the simplest to prepare at home.
Ingredients:

3 Tbsp. - Butter
16 Oz. - Can of tomato puree
3 Tbsp. - Olive Oil
1 Tsp. - Salt
3 Cloves - Garlic, minced
1/4 Tsp. - Black Pepper
3 Large - Yellow onions, minced
1 Tsp. - Whole oregano
2 Qts. - Canned whole Italian tomatoes
1 Tsp. - Whole basil


Process
Melt the butter with olive oil in an oven or large skillet. Now slowly but completely sauté the garlic and onion. Then add the tomatoes, salt, pepper, oregano, basil and puree. Boil it.
Cover the mixture and let it bubble for two hours. In between, stir it occasionally. Crush the tomatoes with the masher. Continue the process till the sauce reaches the consistency of a soup.
Set the sauce aside to cool before applying it to your pizza dough, or, or refrigerate it for use in the future.
Pizza Topping
Ladle about 7 to 8 oz. of pizza sauce into the middle, bottom of the dough shell. Spread the sauce evenly over the surface of the dough sheet. Spoon the sauce out to the edge of the dough sheet. Leave a small margin on the outer-side of the dough sheet, which allows the crust to rise and crisp more quickly than the covered dough; creating the classic, puffed up edge of the pizza.
Now create a layer of the shredded cheese over the sauce. Shred about two cups of cheese. Arrange your toppings over this layer of cheese.
Add toppings according to your preference.
Baking the Pizza

Preheat your oven up-to the temperature of 450° F for about 10 to 15 minutes. When preheating is done, place a prepped pizza in the oven at the centre. Place the pan in the oven such as there is maximum circulation of air around the pan. The baking will take about 10-15 minutes at that temperature.
Signs to look for that the pizza is ready are:

1) The cheese has melted on top and is beginning to brown.
2) The crust edge has browned, from a medium to a golden brown.
3) Now carefully lift the edge of the pizza to inspect its bottom, it should be evenly brown.

If these signs are evident, your pizza's done! Thus now you are ready to throw regular pizza parties of your home made pizza to your friends and family.

Thursday, 6 December 2012

How To Make Rasgulla

What is your choice when it comes to sweets?

What?............... Rasgullas............... is that what your thinking,


I don’t think you’d find anyone who’d say no to them. Not even the hubby who doesn’t really have a sweet tooth says no to Rasgullas! I made these for a special occasion last week, and here’s a visual treat for you guys as well…

Ingredients
  • 1/2 liter Milk
  • 2 tsp Flour (maida)
  • 1/4 tsp Lemon Juice
  • 1 cup Sugar
  • 1 cup Water
  • 4-5 drops Rosewater Essence
1. Heat milk in a pan and bring it to boil for about 8-10 minutes.

2. When it starts boiling, add lemon juice and wait for the milk to curdle completely.
3. Remove from the heat and let it cool for about 3-5 minutes.
4. Pour over a thin muslin/cotton cloth and tie it with a tight knot. On straining this milk, the curd is obtained is called "paneer". wash paneer well using muslin cloth under cold running water to remove lemon juice flavor.
5. Knead paneer for about 5-7 minutes to make a smooth dough. Add flour and knead again for few minutes.The softness of the rasgulla depends on how well you knead the paneer. The more you knead, the more spongy will be the rasgullas

6. Make smalls of about 1 inch in size (8-10) of the dough and keep aside.
7. Next make sugar syrup. Mix sugar, water, and cardamom powder in a saucepan and bring it to boil.
8. Add paneer balls to the hot syrup on a medium heat and cook for about 15-20 minutes with lid partially covered.
9. Transfer into a serving dish.
10. Refrigerate and serve chilled.

Wednesday, 28 November 2012

How to Make Chicken Biryani

  • Ingredients for marinating the chicken
    • 1 Kilo Chicken on the bone cut into 12-16 pieces
    • 1/2 Teaspoon turmeric powder
    • 1 Tablespoon of ginger garlic paste
    • 1 Teaspoon of coriander powder
    • A little salt
Mix all of the above ingredients and let the chicken marinate for 6-12 hours, more the better.
  • Herbs, spices and condiments used are as follows
    • 8 cloves
    • 1 Cinnamon stick
    • 6 green Cardamoms
    • 2 Bay leaves
    • 1/2 Teaspoon shahi jeera (caraway seeds)
    • A few pinches grated nutmeg and mace each
    • 1 Teaspoon Coriander powder
    • 1 Teaspoon red Chili powder (to taste)
    • 5-6 Tablespoon of chopped fresh mint
    • 2-3 chopped green Chilies
    • 4-5 chopped Tomatoes
    • A whole bunch of fresh coriander leaves
  • For fried onions
    • About 8-9 medium size onions
  • Other Ingredients
    • Oil for deep frying and 3-4 tablespoon for cooking
    • 1 Tablespoon of ginger garlic paste
    • 1/2 cup of milk
    • A few strands of Saffron (kesar)
    • Desi ghee (clarified butter) about 6-7 Tablespoons
    • Cashew nuts ( a few or as many as you want)
    • Raisins and almonds are optional
    • Salt to taste
  • Alternative authentic ingredients
    • 1 tablespoon Gram Masala Powder
    • 1 tablespoon or less of Green Cardamom Powder
    • 1 teaspoon turmeric powder
    • 1 teaspoon coriander powder
    • a pinch of red chilli powder(Optional)
    • a pinch of green chilli(Optional)
    • 2 - 3 teaspoon gralic powder
    • 2 -3 teaspoons of onion powder
    • 2 - 4 teaspoons ginger powder
    • 1 kilo basmati, jasmine or ganador rice
    • 1 cup tomato paste(not tomato sauce)
    • 1 cup milk or cream
    • Yogurt
    • Salt to taste
    • Coriander leaves
    • Saffron

    Method

    Deep fry the onions:

    While the chicken is marinating, slice the onions very thin. You can use a food processor for this or a slicer. Now heat oil and fry these sliced onions in batches. The heat should be medium. Definitely not high, otherwise the onions will get burned.
    Stir the onions continuously for uniform browning. When they become light brown, drain them on kitchen paper. Keep them aside. They will get nice crispy as they cool down.

    Cook the Chicken:

    Take a deep, wide mouth vessel and heat 3-4 tablespoons of oil in it. In this add the bay leaves, cloves, cinnamon, cardamoms, little bit of shahi jeera and allow to crackle. Now add a tablespoon of ginger garlic paste and stir a little. Now tip out all the marinated chicken and the marinade. Cook on a high flame so that the water gets evaporated quickly. Add the chopped tomatoes, mint, green chilies, all dry powders(coriander, chili), and salt. Cook till the chicken is cooked and the gravy (masala) is not watery. Add one third of the fried onions. Mix well. Keep aside.

    Boiling the Rice

    Boiling rice is one of the most important part of cooking a biryani. The rice needs to be parboiled. Meaning, it should be three fourth cooked. The rest of it gets cooked on dum (when we layer the chicken and rice, seal it and put on a very slow fire).

    Take a big deep wide mouth vessel, add lots of water (at least 10 times more than rice). Add ample salt (this is very important because the rice needs to be salty when cooked). Also add a cinnamon stick, a couple of green cardamoms, a few cloves and the rest of caraway seeds (shahi jeera), for flavoring the rice.

    Now boil all this for a few minutes on a high flame (7 minutes or so). This is how to check if the rice is done. Without burning your fingers, take a few grains of rice (use a clean spoon to take some out of the boiling water), break a grain, if it breaks into 3 parts easily, your rice is done.

    Strain the rice and spread it on a clean surface (a tray or something), so that it cools faster. If you want to pick out the whole spices which you added, you can do that now. Or else just let them be.

    • Chop the coriander leaves
    • Boil the milk and add crushed saffron in it. Give it a stir.
    • In desi ghee, fry the cashew nuts till golden brown. Also the almonds and raisins, if using. Keep aside.
    • Keep some melted desi ghee aside.
    Layering the biryani:
    • Take a heavy bottom pan with a lid (non stick is best).
    • Take some melted ghee and grease the bottom of the pan with it. Then
    • Put a layer of rice,
    • Then a layer of chicken
    • followed by a layer of fried onions
    • then a layer of chopped coriander.
    • Repeat and finish off with the rice layer. Lastly, sprinkle the leftover fried onions (if any), cashews and other nuts. Pour the saffron milk on top. Also pour some desi ghee down the sides of the pan and some on top of the rice. It will trickle down with the heat.
    • Yep, you are done. Seal the lid by sticking it with some chapati dough or simply fix a big foil before placing the lid. The idea is to restrict the steam from escaping. Place this pot on a very slow flame. Ideally place this vessel on top of another flat pan or tawa, so that the bottom of the pan doesn't come in direct contact with the heat source.
    • Leave for one hour. When you open it, what you get is the magical, flavorsome and aromatic chicken biryani. Please dig in. Don't forget to prepare a riata while your biryani is cooking. Enjoy hot biryani with a cold raita.

    Here is Another method


Sunday, 25 November 2012

Sugar Free Sweets to Make With Children


Children love baking and cooking - and what could be more fun than making sweets?
These sugar free sweets make healthier alternatives to the sweets youngsters traditionally make and then munch their way through!Encourage them to have a bit of fun while they are cooking with you. Let them come up with some of their own ingredients and consider how these could be worked into your dish.

Chocolate Orange Faces

This is a delicious rich sugar free sweet that children will love. It has a fresh, orangey flavour and they can top it off by making their own funny faces from tiny pieces of shredded orange peel.

Ingredients:

  • 400g (14oz) cocoa
  • Five tbs honey
  • 250ml double cream
  • 30g (1oz) butter
  • Two sweet oranges
Method:

Melt your honey, butter and cocoa powder together in a medium pan over a low heat. Stir until completely dissolved. Keeping your pan on a very low heat, gently stir in your cream. Remove from the heat and allow to start cooling. Squeeze your oranges and save the peel. Stir the juice into your cooling liquid. Carefully scrape the pith from the remaining orange peel and cut the peel into tiny circles for eyes and strips for mouths. Grease an 18cm fudge tin and pour your liquid in.
Once it is completely cool, place in the fridge and allow to set over night. Place your tiny peels of cut peel on a place in the fridge too. When the chocolate is set, remove from the fridge and cut into squares with a sharp knife Take your orange peel and make a face on each square. The chocolate should still be soft enough to press the pieces into it. You could even make hair, glasses and moustaches from the shreds of peel too!

Chocolate And Strawberry Shapes

These sweets can be cut into whatever shapes you choose. Try buying seasonal cutters and cutting out sweet Santas, pumpkins or Easter eggs, depending on the time of year.Adorn your sweets with pieces of chewy fresh strawberry if you choose. Use the pieces of fruit to make faces, animal spots or just decorations.

Ingredients:

  • 150g (5oz) cocoa powder
  • Two tablespoons sugar free strawberry jam
  • 150g (5oz) soft ground almonds
  • One small egg
  • Handful of fresh strawberries (optional)

Method:

Melt your cocoa powder and sugar free jam in a small pan. Pour your almonds into a bowl and slowly add the hot liquid. Beat your egg, then add it to the mixture, little by little, until you have a good paste. Place in the fridge and allow to harden. Take your mixture and roll out on a surface that has been lightly dusted with cocoa powder. Take your cookie or sweet cutters and cut into shapes. Place each shape on a lightly greased baking sheet and place in the fridge to set. If you want to dress your sweeties up further, try taking a handful of fresh strawberries, washing and hulling them, then chopping them up and lightly grilling the pieces for a moment or two. Then press your chewy strawberry pieces into the top of each sweet shape to decorate.

Sunday, 18 November 2012

Sugar Free Fruit Fudges

Sugar free fruit fudges work well because the fruit you use in your mixture will often bring an added sweetness with it. Raisins, sultanas, cranberries and other dried fruit are incredibly high in natural sugar and will give an extra sugary burst as you bite into the fudge.Try teaming the fruit up with other flavours as well, to create unusual varieties of sugar free fudge. Cranberries work well with apples, for example, and raisins are delicious with ground almonds. And of course chocolate is always delicious with any fruit. Adults can also choose to add a splash of brandy to liven their fruit fudge up a little!

Sugar Free Hazelnut And Raisin Fudge

This is a serious fudge to get stuck into. Overflowing with fruit and nuts, it has wonderful bite and is extremely filling.

Ingredients:

  • 400g (14oz) cocoa powder
  • 75g (2.5oz) whole hazelnuts
  • 75g (2.5oz) plump raisins
  • 30g (1oz) butter
  • 350ml double cream
  • Four tbsp honey

Method:

Take a large pan and in it place your cocoa powder, butter and honey. Stir over a gently heat until completely melted and your liquid is smooth. Slowly stir in your double cream. Then add your raisins and your hazelnuts. Pour your mixture into a greased fudge tin and allow to cool. Then place in the fridge and leave to set over night. Once solid, mark out and cut into squares.

Cranberry And Apple Fudge

This fudge uses honey again as a sweetener. Added sugar free apple juice also gives it a sweet boost.

Ingredients:

  • Three tbsp honey
  • 200ml double cream
  • 30g (1oz) butter
  • 50ml sugar free apple juice
  • 100g (3.5oz) dried cranberries

Method:

Gently melt your butter and honey together in a medium-sized pan. Then stir in your apple juice and your cranberries. Once completely mixed, remove from the heat and allow to cool. After 10 minutes, stir in your double cream. Pour your mixture into a greased fudge tin and leave to cool. Then place in the fridge over night to set. Mark out and cut into squares.

Chocolate Orange Fudge

The fruit in this recipe is sultana but the strongest flavour comes from the orange. Both work with the granulated sweetener as a sugar replacement. The combination of the strong chocolate with the rich fruitiness of the orange and sultana will create a delicious winter fudge.

Ingredients:

  • 110g (4oz) cocoa powder
  • 110g (4oz) butter
  • One tsp vanilla essence
  • Two sweet oranges
  • 550ml double cream
  • 100g (3.5oz) sultanas
  • Five tbs granulated sweetener (or as per manufacturer’s instructions)

Method:

Melt your butter, cocoa and sweetener in a large pan over a low heat. Stir until completely dissolved. Add your vanilla essence and stir again. Squeeze the juice from your two sweet oranges and grate the zest from the fruit. Stir both the orange juice and zest into your liquid. Remove from the heat and allow to cool. Then stir in your cream and your sultanas. Pour into a greased fudge tin and place in a fridge over night to set. Cut into squares the following day.

Friday, 16 November 2012

How To Make Sugar Free Vanilla and Ginger Crunch

A friend of mine messaged me and asked 
My dad wants me to make homemade ice cream for him, but it cannot have any sugar. 

Does anyone know of a really great sugar-free vanilla ice cream recipe for diabetics??

yes my dear friend here is a recipe for you to try,

The new thing about sugar free ice cream is without the sugar the ice cream will be more solid and icy,and
the crunch of the sugar free ginger biscuits contrasts beautifully with the creamy vanilla ice cream in the recipe. To zing it up further add small pieces of dark sugar free chocolate (or high cocoa content, dark chocolate) at the biscuit stage.

Ingredients:

  • One vanilla pod
  • Three large eggs
  • Two tablespoons granulated sweetener or splenda  (or as per manufacturers instructions)
  • 350ml fresh double cream
  • 400ml full fat milk
  • 10 sugar free ginger biscuits


Method:

Once again begin by taking a medium sized pan. Pour your milk and your double cream into it. Then take your vanilla pod and slit it along one side. Scrape out all the seeds with a teaspoon and put into the cream. Cut the pod into quarters and drop it into the pan too. 
Put to one side for half an hour to allow the liquid to draw the flavour. Then heat the cream and milk over a low heat, stirring occasionally, until it almost reaches boiling point. Set to one side for a further quarter of an hour. Meanwhile, crack your three eggs and separate the yolks into a medium sized bowl. Mix with a fork and then pour your warm vanilla mixture in. Return to your pan and place back on a low heat. Keep stirring until the liquid thickens and becomes custard-like. 
Once again, do not allow the mixture to boil, however. Then remove from the heat, pick out your pieces of vanilla pod and stir in your sweetener. Pour your mixture into a large metal bowl and allow to cool, stirring every so often if a skin seems to be forming. 
Once cool, cover and place in the freezer. Allow to freeze for about three hours then remove from freezer and whisk in a blender. Replace in the freezer then repeat at least three more times every three hours or so. Meanwhile, take your ginger biscuits and place in a large sandwich bag. Using a rolling pin break into small pieces. After your final whisk, stir in the pieces of biscuit, a few at a time. If you wish to add chocolate chunks too, break your sugar free dark chocolate when you crush your biscuits ands stir them in at the same time.

Tuesday, 30 October 2012

Sugar Free Mint Chocolate Ice-Cream

Sugar Free Mint Chocolate Ice-Cream

A chocolate ice-cream with a minty essence, this makes a change from plain chocolate ice-cream. The peppermint essence beautifully complements the bitter cocoa flavour. .

Ingredients:

  • Three egg yolks
  • 200g (7oz) cocoa powder
  • Three tbsp sugar free strawberry jam
  • Half pint of double cream
  • 250ml full fat milk
  • One tsp peppermint essence

Method:

Beat your egg yolks and jam together in a large bowl. In a large saucepan heat your milk and cocoa powder. Stir until all the cocoa has dissolved. Pour into your egg and jam mixture, and mix well. Stir in your cream and peppermint essence. Take a clean airtight container, with a fitted lid, and pour your mixture in. Place in the freezer for two to three hours or until half frozen. Remove and whiz up again. Repeat the process at least once more, preferably twice.

Chocolate Orange Ice-Cream For Grown-Ups

Definitely not a dish for the children, this sugar free chocolate ice-cream calls for a splash of whisky. The whisky gives it a good kick and makes this dessert the perfect way to round off a meal. Those who are happy to have a little sugar in their ice-cream could substitute the whisky and orange for a liqueur of their choosing.

Ingredients:

  • 250g (9oz) cocoa powder
  • Three tbsp sugar free jam
  • Two oranges
  • A splash of whisky
  • One pint of double cream

Method:

Sieve your cocoa into a large bowl and mix with your cream and sugar free strawberry jam, using a hand blender (or whiz all your ingredients in a food processor). Grate the zest of your oranges and squeeze the juice, stir into your liquid ice-cream, along with a splash of whisky Take a clean airtight container, with a fitted lid, and pour your mixture in. Place in the freezer for two to three hours or until half frozen. Remove and whiz up again. Repeat the process at least once more, preferably twice.
Related Posts Plugin for WordPress, Blogger...